Updated: May 30, 2026
Single Contact Messaging
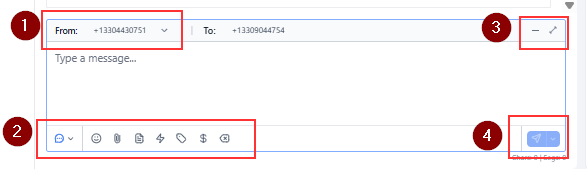
1. Select your phone number/email address
- Navigate to the Conversations tab in the menu pane.
- Select the Contact within the Conversation you wish to reply to
- Click on SMS, WhatsApp, or Email. The messaging field will automatically update based on the channel you select. Use the arrows next to the phone numbers to choose which number you’d like to send the SMS from, or select the desired email address for your message accordingly.
- Send or Schedule for later
Please Note: If the Contact does not have a phone number saved, there will not be an option to send an SMS message. If the Contact does not have an email saved, there will not be an option to send an Email message.
2. Personalization & Attachments
Here, you’ll find intuitive options to enhance your message: use the icons in the lower left of the messaging field to insert Custom Values for personalization tailored to each contact, attach important files or documents as needed, and include Emojis to add a human touch and convey tone.
Note:
If you begin typing a message and leave the screen before sending, your draft will be preserved and ready when you return. This means you won’t lose your progress and can pick up right where you left off without having to retype.
3. Messaging View
Here you can control how the messaging view appears. You can either choose to expand or minimize this field.
4. Send Options
Choose to send messages now, or later. This applies to both email and text.
Group Messages

Group messages
- Go to the Conversations in your account, Click on Create a new message and select Group Message.
- Choose the phone number from which you want to send the group sms.
- Choose the contacts you would like to add in group chat. You must add at-least 2 and maximum 9 participants. You can also add both primary and secondary numbers of contacts.
- Once the group is set up, type your message and click Send. All contacts will receive the message, and when anyone replies, their response will be sent to everyone in the group.
- On the top panel of the group chat window, you can see all the contacts that have been added to the group. You can search for participants by their name or number in the group chat.
Note: If a contact has enabled DND or the number is not a US number you cannot add them to group chat.
- Once a group is created, you cannot change the participants or the business phone number you selected to create the group chat.
- If a contact already in the group is deleted from your account, group messages will still be sent to the phone number that was originally added. Even if the contact's number is modified in the account, the messages will continue to go to the initially added number.
- If a contact in the group enables DND (Do Not Disturb) after the group chat is created, you will no longer be able to use the group chat. To continue group messaging, you will need to create a new group excluding the participant who is marked as DND.